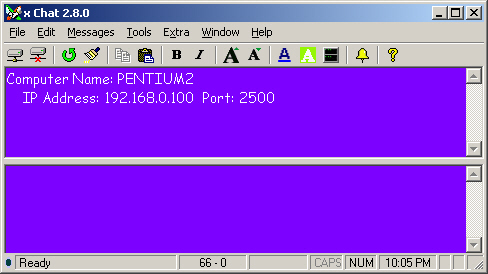
| x Chat - the
main chat screen |
x Chat not only can send plain text, but also the visual effect of the text
and background, sound, drawings and files.
Initial Screen
The screen above is the initial screen when the program
starts. The local network information is for your reference. It will
automatically blank when you are making a connection. (If you want to display
the info again ,you can click 'File' - 'Property',
the info will be returned.)
Tool Bar

- Connect - Make a new connection.
- Disconnect - Disconnect the session and reset the connection status to
listening mode.
- Refresh/Reset - Refresh the screen and reset the connection while not
connected.
- Clear Screen - Clear both local and remote screen.
- Copy - Copy text
- Paste - Paste text
- Bold - Bold all text in local window.
- Italic - Italic all text in local window.
- Increase Font Size locally
- Decrease Font Size locally
- Set Font Colour locally
- Set Background Colour locally
- Override remote font and background settings
- Ring - Send audio signal to remote user.
- Help
Status Bar

To Check Connection Status
Watch for the status bar in the bottom.
The status indicator
 Black - Disconnect / Ready (Listening Mode)
 Green- Data Sent
 Red - Data Received
Character Count
The second section indicates the
number of local and remote characters. The limit of characters is 36,000.
Online Time
The third section of status bar shows the online session
time.
Caps Lock
The fourth section indicates caps
lock status.
Num Lock
The fifth section indicates num
lock status.
Local Time
The sixth section indicates local
time.
To Connect:
- Make sure you are connected to network.
- The word 'Ready' is shown in the status bar.
- Click 'File' - 'Connect' or click the first button. You will
see the following.
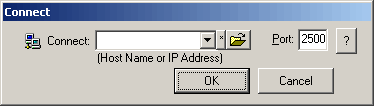
- Enter IP address or hostname and check the port value that match with
remote user.
*Note* Hostname may or may not equivalent to
computer name (NetBIOS).
- Hit 'OK' and wait for remote user response.
*Note* If remote user turn off the Auto
Accept Connection, you have to wait forever until he/she responses.
(i.e. User is away.)
*Note* If you enter Port address not correctly, the program will try
the successive numbers for the port value.
To Be Connected:
- Make sure you are connected to network.
- Check the screen that show your IP Address and port correctly.
- Ready is shown in the status bar. (If not, click the 'Refresh'
button or use the menu 'Refresh'.)
*Note* Refresh performs different function
after a connection is made.
To Browse Network
- Click Extra - Net View.
- Click Net View button.
To Check Your Local Hostname or IP address
- Click File - Property.
To Check A Specific Hostname or IP address
- Click Extra - Net Resolve.
- Enter either Hostname or IP address and click Net Resolve button.
(or Press Enter)
To Use Drawing Board
- After connected to remote computer,
- Click Tool - x Draw.
To Send File
- After connected to remote computer,
- Click Tool - Send File. (or Drag and drop a file to remote
(lower) window)
*Note* During file transferring, you may
continue chatting but it will slow down the file sending.
*Note* File Sending is disable in the following situations:
- x Draw is opened.
- Remote user paused the file sending before.