x Draw is an integral part of x Chat. Same as x Chat main window, everything
you do here will show on your partner's screen at real time.
When you open x Draw during a session, remote x Chat will open x Draw at the
same time. It does not only offer you a drawing board, it also add a single line
text chat with enhanced drawing board features, such as input image, screen
capture and saving feature.
Step 1
The most common used drawing tools are the following:
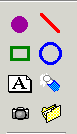 |
Spot - Adjustable
spot size give you flexible drawing.
Line - Drawing a straight line.
Square - An empty Square with adjustable
thickness size.
Circle - An empty Circle with adjustable
thickness size.
Label - Add label to your drawing.
Erase - Erase a small piece or the whole
drawing by right click.
Screen Capture - A light version of screen
capture.
Image Input - Save your drawing time by input
graphics. |
Step 2
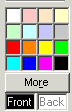 |
You can have a choice of 16 colours or click
more to select up to 24 bits colours for your drawing. You are not only
allowed to choose colour for your drawing, you could also customize your
background colour. Of course, this drawing board is mutual interactive.
What remote user change would reflect in your drawing board and vice
versa. |
Step 3

 |
Each drawing tools such as spot, line, square
and circle has a choice of the thickness. They can be provided for more
than just a simple drawing. Each drawing stroke will stay on top of the
other. (The only exception is the screen capture or input graphics.)
You may also customize a colourful label to your drawing.
|
When you satisfy the drawing, you could save it in bitmap format.
How to use Screen Capture
- Click Screen Capture button.
- Draw a square that big enough to store the image.
- The x Draw window will minimize, you have to select a application window.
- When the x Draw restore to it's normal mode, the transferring of the image
will begin.
How to use Image Input
- Click Image Input button.
- Draw a square that big enough to store the image.
- Select a graphic or photo.
- The transferring of the image will begin.
Note: The screen capture and image input features will take a
while by transfer the image to remote user.